概要
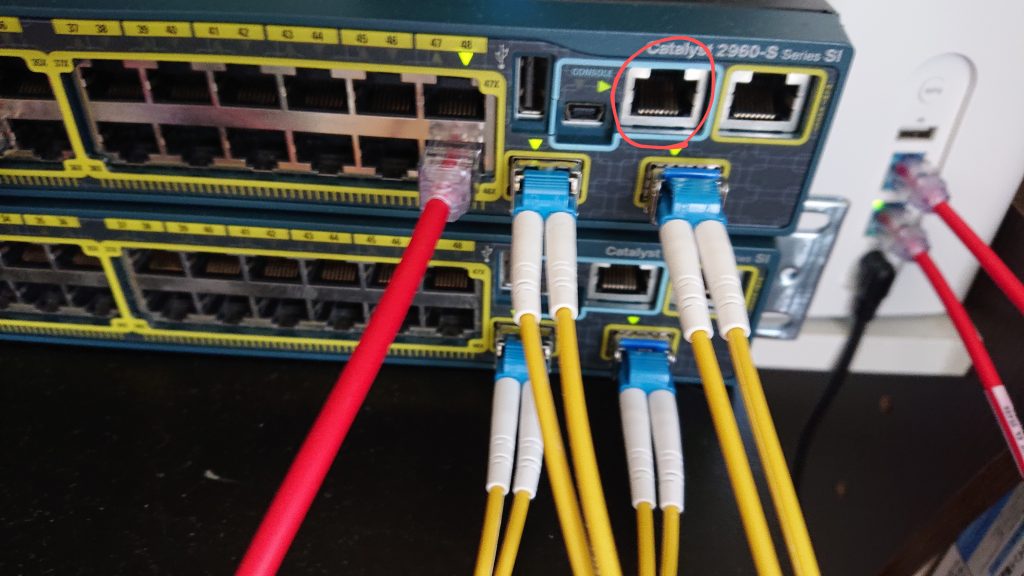
CiscoのスイッチにはSFPポートが付いているものがあります。
このような機種で光ケーブルを使えます(図1に光ファイバの導入を示します)。
光ケーブルは安価で、高速かつ損失が少ない点が銅線より優れています。無理な折り曲げや圧力に弱く、修理も困難な点が欠点です。
☆本記事に書かれている内容ーーーー
・光ファイバの導入方法
・エラー対応
--------------ーーー
手順
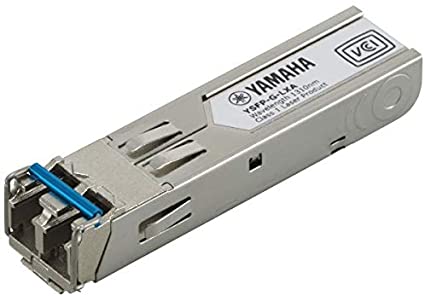
①Cisco製のSFPモジュールを使っている場合
入りそうな場所にモジュールを挿すだけです。SFPモジュールは図2のような形をしています。
②サードパーティ製のSFPモジュールを使う場合
とりあえず、ケーブルを挿す前に
Switch>enable
Switch#config terminal
(config)#no errdisable detect cause all
(cnofig)#service unsupported-transceiver
とします。この設定前にケーブルを挿入するとポートが落ちます。
Apr 20 23:09:15.451 JST: %GBIC_SECURITY_CRYPT-4-VN_DATA_CRC_ERROR: GBIC in port Gi0/49 has bad crc
Apr 20 23:09:15.451 JST: %PM-4-ERR_DISABLE: gbic-invalid error detected on Gi0/49, putting Gi0/49 in err-disable state
この場合、スイッチを再起動するだけでは修復できず、以下のコマンドを入力する必要があります。
Switch#show errdisable recovery
Switch#conf t
(config)#errdisable recovery cause bpduguard
(config)#errdisable recovery interval 30
30秒ほど待つとポートが自動で復旧します。もしループ検知を使っていて、errdisableしたくない場合(もしくはなぜかリンクしないポートがある場合)はインターフェイスを再起動します。
(config)#interface Gi 0/50 (該当のinterfaceを選択)
(config-if)#shutdown
(config-if)#no shutdown
光ファイバの減衰が異常(正規品ではないため)というエラーも出ていましたが、上の手順で出なくなります。
受光レベルの調べ方
次のコマンドを入力します。
Switch#show interface transceiver details↓出力結果
Switch#show interface transceiver details
mA: milliamperes, dBm: decibels (milliwatts), NA or N/A: not applicable.
++ : high alarm, +  : high warning, -  : low warning, -- : low alarm.
A2D readouts (if they differ), are reported in parentheses.
The threshold values are calibrated.

                              High Alarm  High Warn  Low Warn   Low Alarm
          Temperature         Threshold   Threshold  Threshold  Threshold
Port       (Celsius)          (Celsius)   (Celsius)  (Celsius)  (Celsius)
--------- ------------------  ----------  ---------  ---------  ---------
Gi0/49      38.0                93.0        88.0       -43.0      -48.0
Gi0/50      36.4                90.0        85.0       -40.0      -45.0

                              High Alarm  High Warn  Low Warn   Low Alarm
           Voltage            Threshold   Threshold  Threshold  Threshold
Port       (Volts)            (Volts)     (Volts)    (Volts)    (Volts)
---------  ---------------    ----------  ---------  ---------  ---------
Gi0/49     3.27                  3.80        3.50        3.10       2.80
Gi0/50     3.24                  3.80        3.70        2.80       2.70

           Optical            High Alarm  High Warn  Low Warn   Low Alarm
           Transmit Power     Threshold   Threshold  Threshold  Threshold
Port       (dBm)              (dBm)       (dBm)      (dBm)      (dBm)
---------  -----------------  ----------  ---------  ---------  ---------
Gi0/49      -2.1                 2.0         1.0        -6.0       -7.0
Gi0/50      -4.8                 1.0        -1.0       -11.0      -12.0

           Optical            High Alarm  High Warn  Low Warn   Low Alarm
           Receive Power      Threshold   Threshold  Threshold  Threshold
Port       (dBm)              (dBm)       (dBm)      (dBm)      (dBm)
-------    -----------------  ----------  ---------  ---------  ---------
Gi0/49      -2.7                 2.0         1.0       -19.0      -20.0
Gi0/50 -4.8 -1.0 -3.0 -24.0 -26.0Tx(送信)またはRx(受信)のいずれかの電力が-30dBmの場合、通信が行われません。下表は別のサイトからの引用です。
| dBm (デシベル) | μW (マイクロワット) | mW (ミリワット) | 説明 |
|---|---|---|---|
| -30 | 1 | 0.001 | 信号の損失 |
| -20 | 10 | 0.01 | |
| -16 | 25.1 | 0.0251 | 2Gbpsの最小受付信号 |
| -15 | 31.6 | 0.0316 | 4Gbpsの最小受付信号 |
| -13.01 | 50 | 0.05 | |
| -10 | 100 | 0.1 | 2Gbpsの最小送信信号 |
| -9 | 125.9 | 0.1259 | 4Gbpsの最小送信信号 |
| -8.24 | 150 | 0.15 | |
| -6.99 | 200 | 0.2 | 通常の光信号強度範囲 |
| -6.02 | 250 | 0.25 | |
| -5.23 | 300 | 0.3 |
2件のコメント